
Configure Cisco Router Passwords – GNS3 Lab
In this tutorial we will use GNS3 to do a very basic task to secure your routers – apply a password so that users will be asked for this password when try to enter the privileged mode. For example:
Router>enable
Password: ******* (enter that password here)
Router# (this is the privileged mode)
Now let’s start!
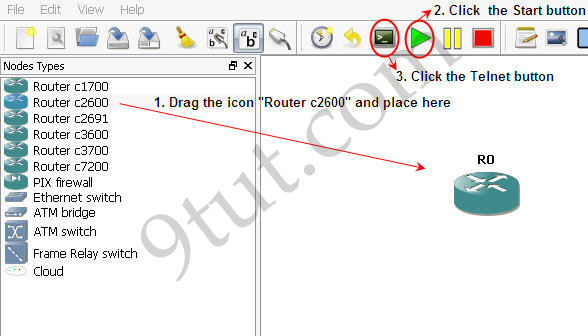
First launch the GNS3, for this tutorial I use the IOS c2600-bin-mz.123-6f.bin but this is a very fundamental lab so you can use any IOS you have.
1. Drag the Router c2600 the place it onto the right-side box,
2. Click the Start button (the green triangle button)
3. Click the Telnet to all IOS button (the black button) to open the Telnet command line interface (CLI).
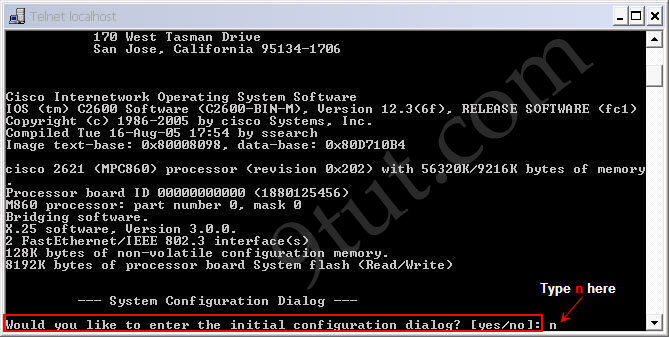
The CLI window will appear, asking “Would you like to enter the initial configuration dialog? [yes/no]:”. Type n here as we want to configure this router manually.
Wait for a few seconds and now the router will be ready for the configuration.
Router>enable
Router#configure terminal (or type conf t as a shortcut)
Router(config)#enable password digitaltut
Router(config)#exit (or press Ctrl-Z)
Router#exit (to exit privileged mode)
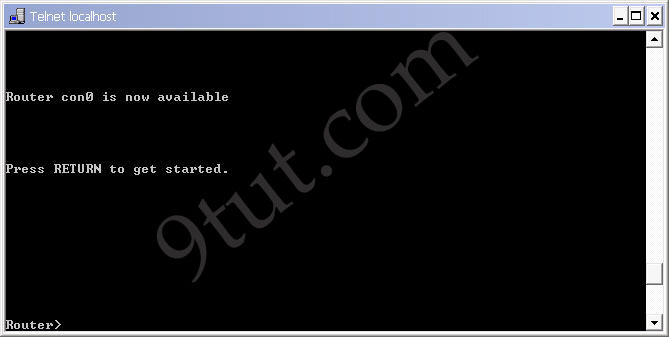
We logged out the router, notice that you will see two lines “Router con0 is now available” and “Press RETURN to get started.” Press Enter to enter the user mode (a line Router> will appear)
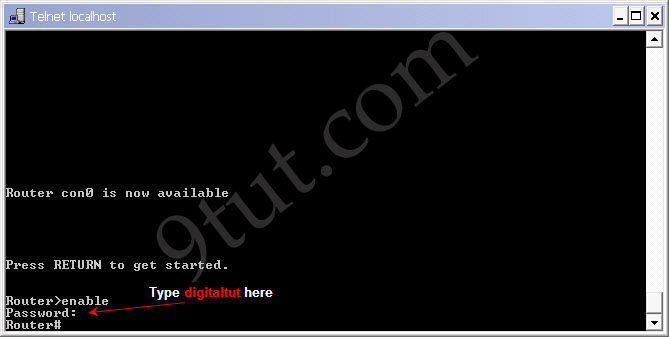
Now we can test if the password is working. Log in the privileged mode with the enable command
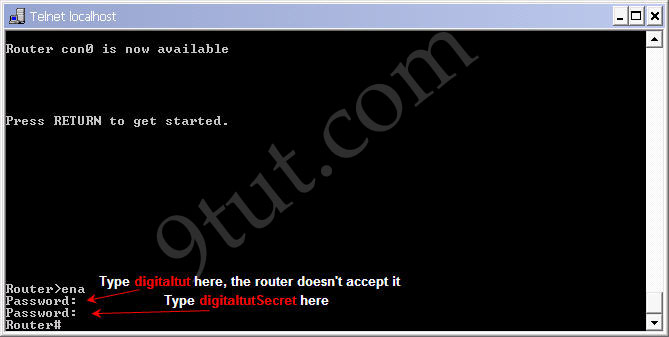
Router>enable
Now we can see the router is asking for a password. Type “digitaltut” as its password here and we can log in to the privileged mode
Notice that we with the “enable password” command, the router will save our password in plain text. It means if someone types show running-config on our router, they can see our password.
Router#show running-config (or show run)
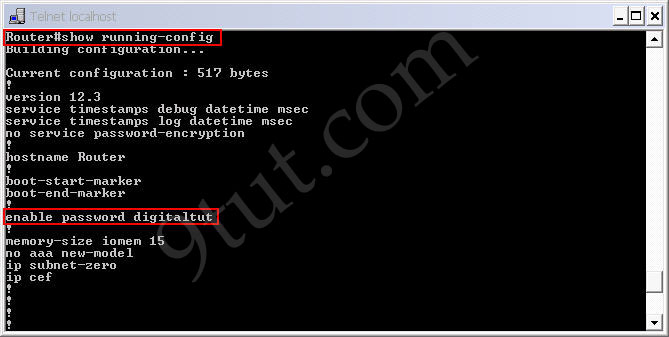
This is a thing we don’t want as our router is not secured completely. In fact, most of the administrators use the “enable secret” command nowadays. To do it, in the privileged mode type the following commands:
Router#config terminal
Router(config)#enable secret digitaltutSecret (notice the letter “S” is capital)
Router(config)#exit
Router#exit
Now try to log in the privileged mode again (type enable in the user mode). First, try the password digitaltut again; the router will not accept this password anymore. Now type digitaltutSecret and we can login! (make sure you capitalize the letter S).
So notice that if you configure the enable secret command, it takes precedence over the enable password command. The two commands cannot be in effect simultaneously.
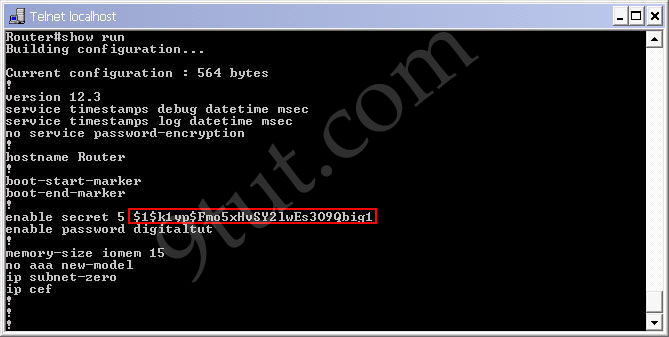
The enable secret command will encrypt the password so no one can see the password with the show running-config command. We can check it.
Router#show running-config
We can also set the password for console and vty (telnet) login with these commands:
Set console password:
Router#config terminal
Router(config)#line console 0
Router(config-line)#password cisco
Router(config-line)#login
Router(config-line)#exit
Set vty (virtual terminal lines) password:
Router#config terminal
Router(config)#line vty 0 4
Router(config-line)#password cisco
Router(config-line)#login
Router(config-line)#exit
By default, a Cisco router supports 5 simultaneous telnet sessions. By using the command line vty 0 4, the configuration below will be applied to all 5 sessions (line 0 to line 4).
Notice these passwords are not encrypted and we can see them with the “show running-config” command. We can encrypt all the passwords with the service password-encryption command in global configuration mode
Router(config)# service password-encryption
Another notice is that we can’t login to a Cisco router via telnet if we don’t set a vty line password for it.


Guys any one with EVE-NG CCNA labs