
Configure SSH for Remote Access on Cisco Router
One of the most popular way to access a Cisco router remotely is using Telnet but it is an unsecured method as the data is sent unencrypted. If a bad person grabs data from a Telnet session, he can see details like a user’s username and password, giving them access to your router.
SSH (Secure Shell) is a secure method for remote access as it includes authentication and encryption. To do this, it uses a RSA public/private keypair. In this tutorial we are going to learn how to configure SSH for R1 to accept remote SSH access with the topology below.

Configuration
The first thing we need to do is generating a RSA keypair. The name of the RSA keypair will be the hostname and domain name of the router so we have to configure these two things first.
1. Configure a hostname for the router
Router(config)#hostname R1
2. Configure a domain name
R1(config)#ip domain-name 9tut.com
3. Generate the RSA keypair
This RSA keypair will be used to encrypt the SSH packets with the crypto key generate rsa command.
R1(config)#crypto key generate rsa
The name for the keys will be: R1.9tut.com
Choose the size of the key modulus in the range of 360 to 4096 for your
  General Purpose Keys. Choosing a key modulus greater than 512 may take
  a few minutes.

How many bits in the modulus [512]: 2048
% Generating 2048 bit RSA keys, keys will be non-exportable...
[OK] (elapsed time was 3 seconds)
The message that is displayed right after we enter this command: “The name for the keys will be: R1.9tut.com”, which combines the hostname of the router along with the domain name we configured to get the name of the encryption key generated; this is why we have to configure hostname and domain name first.
The router also asks to choose a size of modulus for the key we are about to generate. The higher the modulus, the stronger the encryption of the key. For our example, we’ll use a modulus of 2048 which is safe nowadays.
4. Configure VTY lines to use SSH only (Telnet will be refused)
R1(config)#line vty 0 4
R1(config-line)#transport input ssh
R1(config-line)#login local
If for some reasons we still want to allow Telnet along with SSH then we can use the “transport input ssh telnet” instead.
5. Create a username/password in local database on the router
R1(config)#username admin password password_SSH
Verification
1. SSH from another Cisco device
Cisco routers also support a simple SSH client via CLI so we can connect to R1 easily. On R2 we can use the “ssh” command to SSH to R1:
R2#ssh -l admin 192.168.12.1
Password: ************ //type "password_SSH' here
R1>
“-l” means we will provide the username (“admin” in this case) along with this parameter.
Yes! we can now SSH to R1!
2. SSH from a computer
A normal computer usually has not supported SSH Client so we need to install one. One of the most popular and free SSH Client software is Putty so we should download and use it.
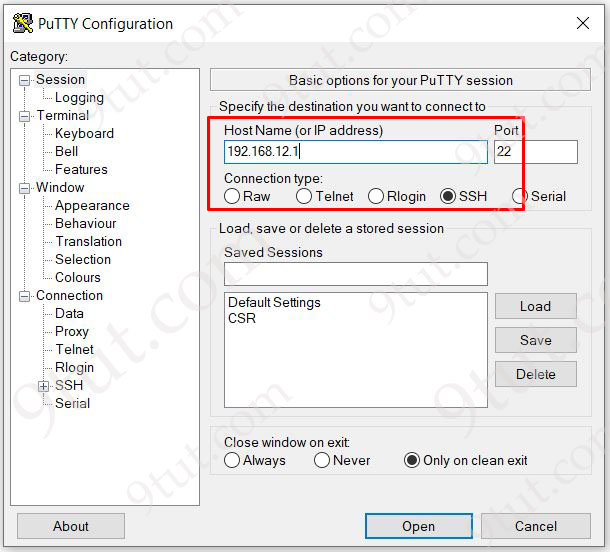
Suppose we replace R2 with a configured PC. Open Putty and type “192.168.12.1” for the “Host Name” field, Port 22 (SSH) and click “Open” to connect to the router via SSH.


Good, also just a comment that windows 10 has ssh also.
hi. i have one question. where is this 192.168.12.1 ip is configured?
@nishat It’s a typo. Supposed to be 192.168.1.1
doesnt sound like that would be hard to hack.. talk about minimal security regresshion cve
Works good
What are the expected simulation contents that will appear in the CCNA v1.1 exam?
What are the expected topics for CCNA v1.1 200-301 for December 2025 ?