Configure DHCP Packet Tracer Lab
In this real world scenario, we will configure R1 as a DHCP server while Client 1 will be DHCP client with the topology shown below:
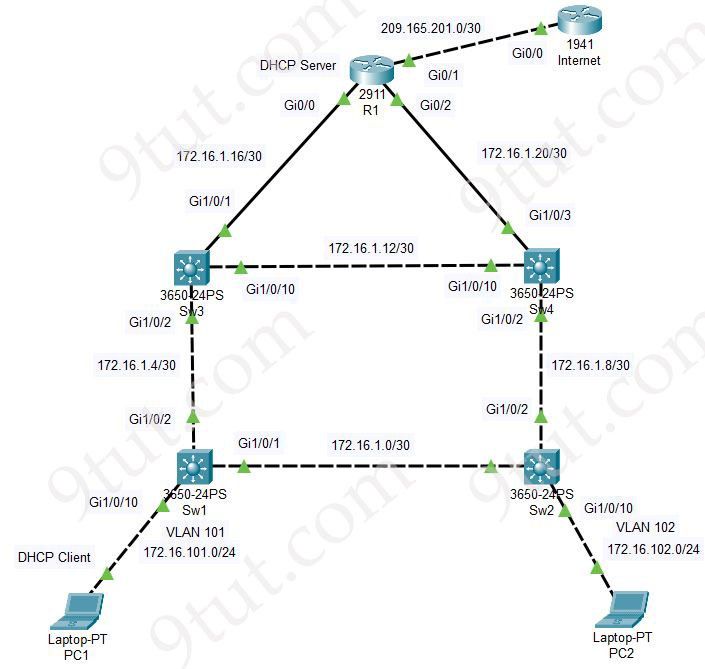

In this real world scenario, we will configure R1 as a DHCP server while Client 1 will be DHCP client with the topology shown below:
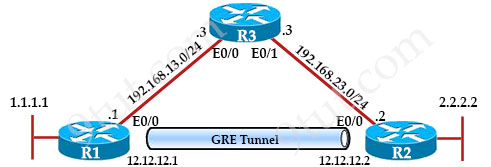
In this lab we will configure GRE Tunnel between R1 & R2. Notice that in the topology below, R1 & R2 are not directly connect to each other. They are connected through R3 only.
In this lab we will learn a simple eBGP (two BGP routers with different Autonomous System numbers) configuration between two routers with the topology below:

First we need to configure some interfaces on two routers as follows:
| R1(config)#interface fastethernet0/0 R1(config-if)#ip address 11.0.0.1 255.255.255.0 R1(config-if)#no shutdown R1(config-if)#interface loopback 0 R1(config-if)#ip address 1.1.1.1 255.255.255.0 |
R2(config)#interface fastethernet0/0 R2(config-if)#ip address 11.0.0.2 255.255.255.0 R2(config-if)#no shutdown R2(config-if)#interface loopback 0 R2(config-if)#ip address 2.2.2.2 255.255.255.0 |
In this article we will create a Frame Relay in GNS3 to learn how to configure Frame-Relay.
Note: If you need to revise your Frame Relay knowledge, we recommend you to read our Frame Relay tutorial first.
First we create 4 routers and link them as follows:
IOS used in this lab: c2600-bin-mz.123-6f.bin
In this article we will demonstrate how to configure NAT using GNS3
Note: If you are not sure about NAT, please read my Network Address Translation NAT Tutorial
To configure static NAT we need to complete these tasks:
* Define the router’s interfaces as inside or outside:
R0uter(config-if)#ip nat inside (or ip nat outside)
* Define static mapping between the inside address and the outside address:
R0uter(config)#ip nat inside source static
+ Static NAT:
To make everything clear, we will configure static NAT in GNS3. Open your GNS3 and build a topology like this:

(IOS used: c2600-bin-mz.123-6f.bin but you can use other versions)
We should use 3 routers in this topology but I want to save some RAM and demonstrate how to ping from the loopback interface so I only use two :) Therefore we should configure the loopback interface of R0 as the source IP address and the fa0/0 interface of R0 as the “outgoing static NAT” address.
In this tutorial we will connect two routers via static route with GNS3.
Static route and Dynamic route
Static route tells the device exactly where to send traffic, no matter what. Static route is often used when your network has only a few routers or there is only one route from a source to a destination. Dynamic routes, on the other hand, use a routing protocol to determine the best path and the routes can be changed depending on specific parameters (like bandwidth, delay, cost…). With dynamic routes, routers can communicate with each other to exchange routing information. In ROUTE 642-902 you will learn about dynamic routing protocols such as OSPF, EIGRP and BGP (RIP is also a dynamic routing protocol but it is not mentioned in ROUTE).
The simple syntax of static route:
ip route destination-network-address subnet-mask {next-hop-IP-address | exit-interface}
+ destination-network-address: destination network address of the remote network
+ subnet mask: subnet mask of the destination network
+ next-hop-IP-address: the IP address of the receiving interface on the next-hop router
+ exit-interface: the local interface of this router where the packets will go out
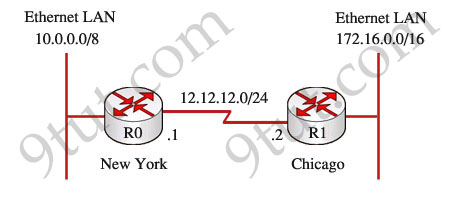
Now we consider a real-world example of static routing. Suppose that your company has 2 branches located in New York and Chicago. As the administrator of the network, you are tasked to connect them so that employees in the two LANs can communicate with each other. After careful consideration you decided to connect them via static route.
In this tutorial we will use GNS3 to do a very basic task to secure your routers – apply a password so that users will be asked for this password when try to enter the privileged mode. For example:
Router>enable
Password: ******* (enter that password here)
Router# (this is the privileged mode)
Now let’s start!
First launch the GNS3, for this tutorial I use the IOS c2600-bin-mz.123-6f.bin but this is a very fundamental lab so you can use any IOS you have.
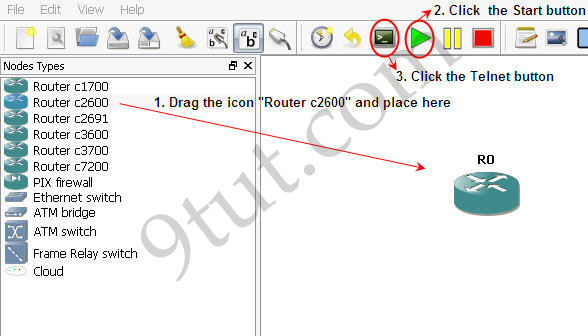
1. Drag the Router c2600 the place it onto the right-side box,
2. Click the Start button (the green triangle button)
3. Click the Telnet to all IOS button (the black button) to open the Telnet command line interface (CLI).
In this tutorial we will use RIP version 2 as the routing protocol so that the loopback interface of R0 can communicate with the loopback interface of R2.
A quick summary of RIPv2:
1) Routing Information Protocol (RIP) is a true distance-vector routing protocol
2) RIP permits a hop count of up to 15, so anything that requires 16 hops is deemed unreachable.
3) RIP sends the complete routing table out to all active interfaces every 30 seconds (RIP updates occur every 30 seconds)
4) RIP version 2 does send subnet mask information with the route updates. This is called classless routing.
5) RIP only uses hop count to determine the best way to a remote network (a hop is a router)
6) Administrative Distance is 120
7) Support VLSM & discontiguous networks
Note: If you are not sure about RIP, please read my RIP tutorial first
Below is the topology of this lab

Configuring interfaces for R0, R1 & R2:
In this tutorial we will learn how to use EIGRP to run a small network with 5 routers. Below is the topology of this lab
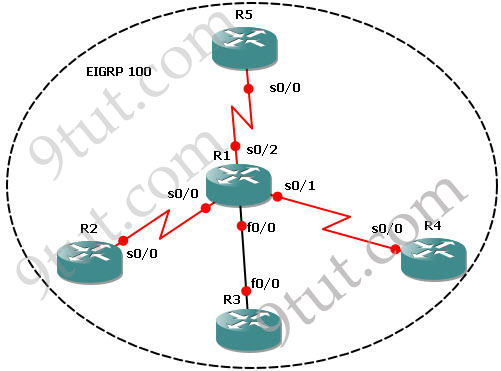
This lab consists of 5 routers and we need to configure EIGRP among them. It is done when we can successfully ping among R2, R3, R4 & R5 and the routing tables of these routers show that they are running EIGRP (with letter “D”).
IOS used in this tutorial: c2600-bin-mz.123-6f.bin (with a minimum of 64 MB RAM) but you can use other IOS.
Note: If you are not sure about EIGRP, please read my EIGRP Routing Protocol tutorial first
Become a member to learn all the tutorials, practice all questions and labs on our site!