
Configuring RIP – GNS3 Lab
In this tutorial we will use RIP version 2 as the routing protocol so that the loopback interface of R0 can communicate with the loopback interface of R2.
A quick summary of RIPv2:
1) Routing Information Protocol (RIP) is a true distance-vector routing protocol
2) RIP permits a hop count of up to 15, so anything that requires 16 hops is deemed unreachable.
3) RIP sends the complete routing table out to all active interfaces every 30 seconds (RIP updates occur every 30 seconds)
4) RIP version 2 does send subnet mask information with the route updates. This is called classless routing.
5) RIP only uses hop count to determine the best way to a remote network (a hop is a router)
6) Administrative Distance is 120
7) Support VLSM & discontiguous networks
Note: If you are not sure about RIP, please read my RIP tutorial first
Below is the topology of this lab

Configuring interfaces for R0, R1 & R2:
R0(config)#interface s0/0
R0(config-if)#ip address 192.168.1.2 255.255.255.0
R0(config-if)#no shutdown
R0(config-if)#interface lo0
R0(config)#ip address 12.0.0.1 255.0.0.0
R1(config)#interface s0/0
R1(config-if)#ip address 192.168.1.1 255.255.255.0
R1(config-if)#no shutdown
R1(config-if)#interface f0/0
R1(config-if)#ip address 192.168.2.1 255.255.255.0
R1(config-if)#no shutdown
R2(config)#interface f0/0
R2(config-if)#ip address 192.168.2.2 255.255.255.0
R2(config-if)#interface lo0
R2(config-if)#ip address 200.200.200.1 255.255.255.0
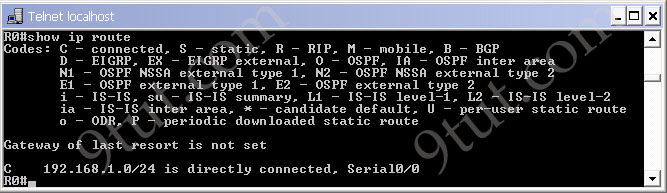
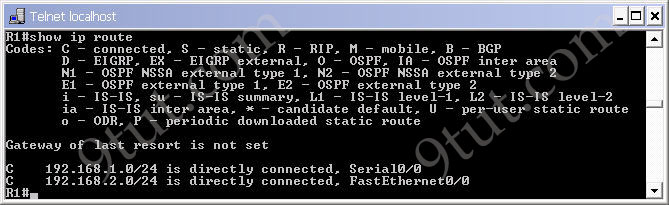
Before enable RIP we should check the routing table on these routers to understand what has been changed in these routers.
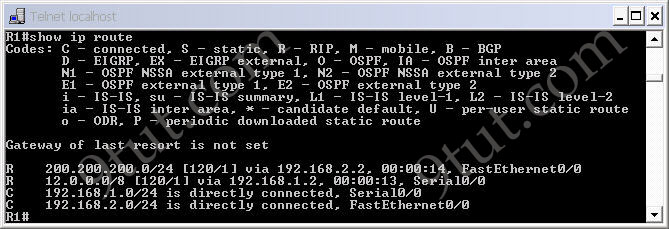
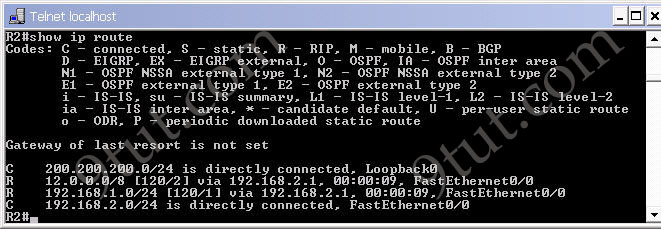
R0
R1
R2
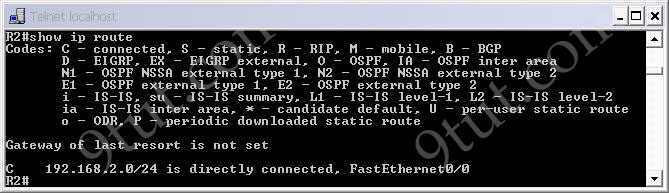
Notice that these 3 routers only see the directly connected routers.
Now if you ping from the loopback (or any interface) of R0 to the loopback (or any interface) of R2 then the it will not successful because R0 doesn’t know which interface it should send the packets out to reach network 200.200.200.0.
Now enable RIPv2 on three routers
R0(config)#router rip
R0(config-router)#version 2
R0(config-router)#network 12.0.0.0
R0(config-router)#network 192.168.1.0
R1(config)#router rip
R1(config-router)#version 2
R1(config-router)#network 192.168.1.0
R1(config-router)#network 192.168.2.0
R2(config)#router rip
R2(config-router)#version 2
R2(config-router)#network 200.200.200.0
R2(config-router)#network 192.168.2.0
Notice that with RIP protocol we just need to type the main network without subnet mask or wildcard mask. If you type a subnetwork, it will be auto summary into the main network.
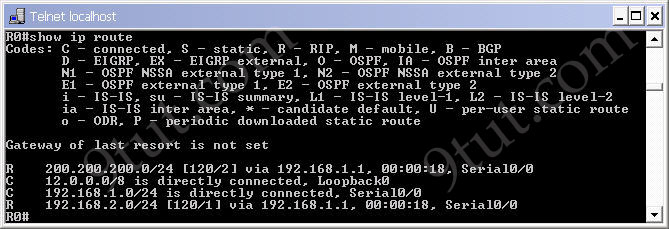
Check the routing tables of these routers we will see the differences
R0
R1
R2
Now we can ping from the R0’s loopback interface to the R2’s loopback interface as the routing table of R0 has a path to R2’s loopback interface and vice versa.
If you want to check what is inside the update packet, use the command debug ip rip.
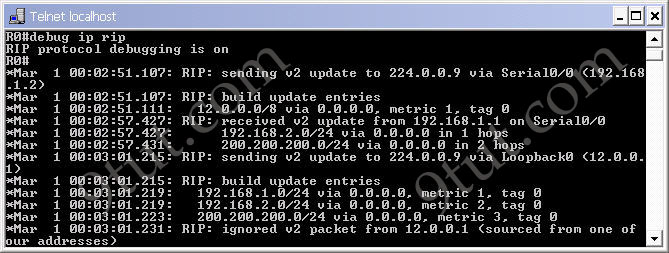
To turn off the debug ip, use the command undebug ip rip. If you want to disable all the debug processes, use the command undebug all.


Vti dynamic
hey!!
i dont understand how to configure RIO
@hubert do you know @Kerstin
no not really
@ Kerst in orsch bummst
hahahahaah @hubert you stupid dumbass
What do i need to do all of this sh*t?
Configuring interfaces for R0, R1 & R2:
R0(config)#interface s0/0
R0(config-if)#ip address 192.168.1.2 255.255.255.0
R0(config-if)#no shutdown
R0(config-if)#interface lo0
R0(config)#ip address 12.0.0.1 255.0.0.0
R1(config)#interface s0/0
R1(config-if)#ip address 192.168.1.1 255.255.255.0
R1(config-if)#no shutdown
R1(config-if)#interface f0/0
R1(config-if)#ip address 192.168.2.1 255.255.255.0
R1(config-if)#no shutdown
R2(config)#interface f0/0
R2(config-if)#ip address 192.168.2.2 255.255.255.0
R2(config-if)#interface lo0
R2(config-if)#ip address 200.200.200.1 255.255.255.0
stop the yap and ask KERSTIN for help